
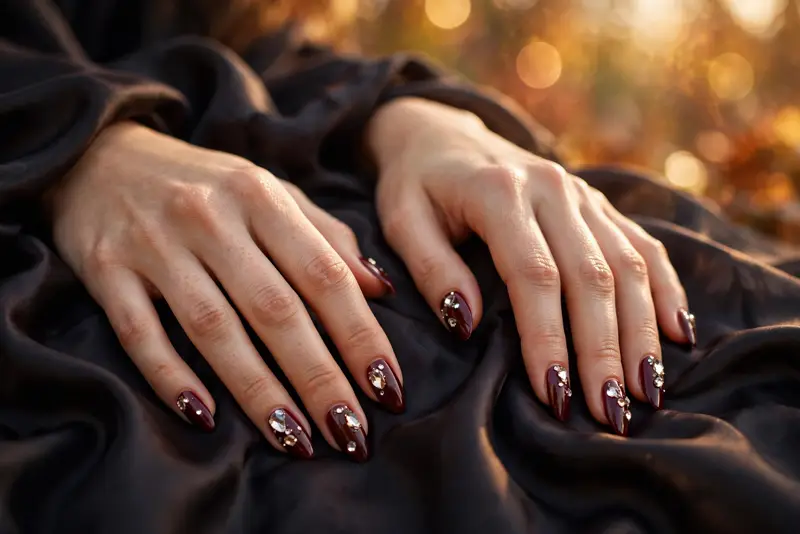
12 Bedazzled Nail Designs Taking Over Fall 2026
Bedazzled nails are having a serious moment this fall. After several seasons of quiet, barely-there manicures, crystals, rhinestones, and gems are back — and the current Pinterest surge behind “Bedazzled Everything” has pushed them firmly into fall 2026 territory. Stones catch low autumn light in a way flat polish never can, and a few well-placed crystals can turn even a simple nude manicure into something worth a second look.
This collection covers twelve distinct directions, from a single stone on matte black to full-coverage crystal coffins, with ideas for short natural nails and long stilettos alike. Some take ten minutes at home with a dotting tool and nail glue; others are worth booking a skilled tech for. Every design is built around fall’s palette — burgundy, chocolate, espresso, taupe, and black cherry.
1. Cuticle Constellation on Bare Almond
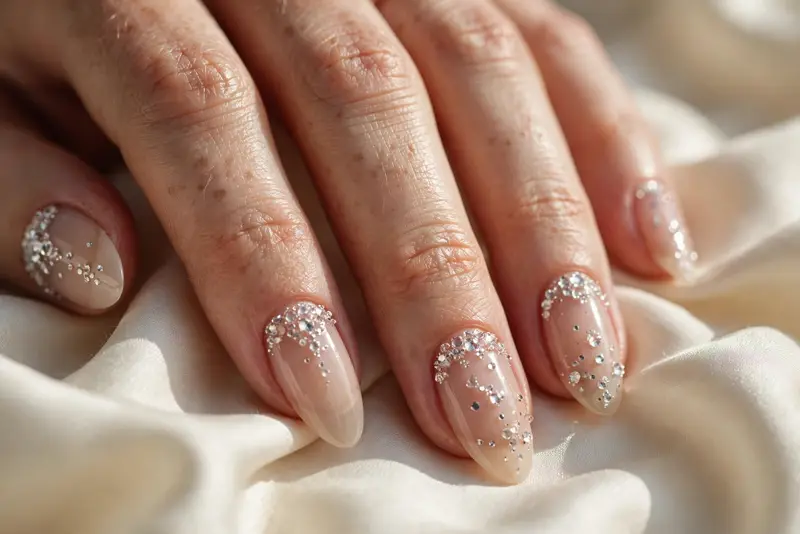
A sheer nude base — think OPI’s Bubble Bath or CND’s Romantique — filed into a soft almond, with small clear crystals clustered along the cuticle in a scattered constellation pattern. The stones sit densest right at the base of the nail and thin out as they drift toward the tip, like stars fading into a night sky. Swarovski flat-backs in SS5 to SS9 give you the size range to pull this off; the smallest stones melt into the polish while the larger ones anchor the composition.
The reason this works is placement. The eye naturally travels to the cuticle area first, and a gradient of sparkle there makes the entire nail bed look longer and more deliberate. Because the base is nearly bare, the design reads clean rather than busy, which is exactly why it suits both office settings and evenings out. Almond is the right shape here — its tapered silhouette echoes the narrowing scatter of stones.
To recreate it, paint two coats of your sheer nude, then use a wax-tipped applicator or dampened dotting tool to place each stone into a dot of nail glue while it is still tacky. Work from largest to smallest. Seal the edges of the stones with a thin brush of top coat, not over the tops, so they keep their fire. To personalize, swap clear crystals for champagne or light rose stones, or concentrate the cluster on an angle for an asymmetric feel.
2. Full-Coverage Crystal Coffin in Deep Burgundy
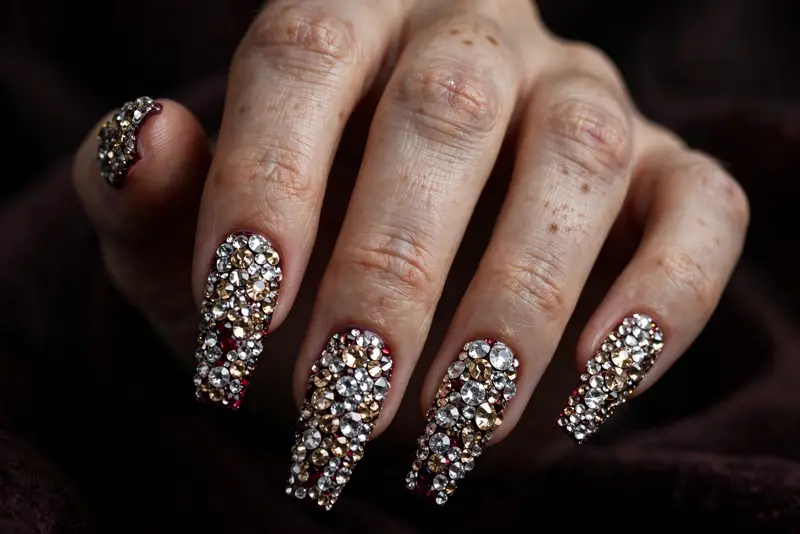
Deep burgundy polish — OPI’s Malaga Wine is the reference shade — on long coffin nails, with the entire nail plate covered in a dense field of mixed-size clear and champagne crystals. No base color shows through except in the hairline gaps between stones, where the burgundy glints like the setting of a vintage brooch. This is the maximalist end of the bedazzled spectrum and it makes no apology for it.
What keeps it from reading as costume jewelry is the color discipline. Restricting the palette to clear and champagne stones over a single dark base creates a cohesive, jewel-box effect; mixed cuts (round chatons with a few navette shapes) add dimension because each facet catches light at a different angle. The burgundy underneath does real work too — it deepens the sparkle and ties the manicure to fall’s dominant color story.
This is a salon design. Ask your tech for a builder gel base (Aprés or Kiara Sky both make reliable ones) and have the stones set into a layer of clear builder or a dedicated gem gel, then cured under a UV/LED lamp. Expect two hours in the chair and a manicure that lasts three weeks. To personalize it, keep nine nails in plain burgundy and go full crystal on one accent nail per hand — you keep the drama at a fraction of the maintenance.
3. Encapsulated Ice French
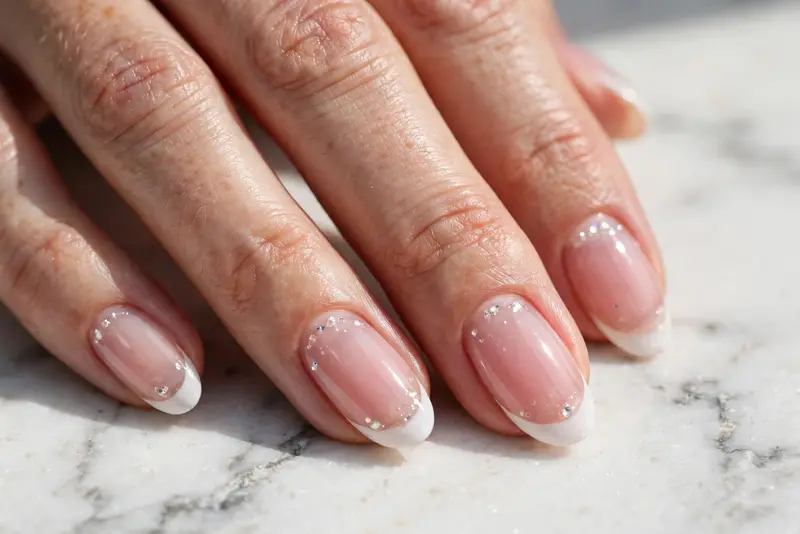
A classic French manicure — sheer pink base, clean white smile line — with fine crystal dust and a scattering of tiny stones sealed permanently under a layer of clear builder gel. Encapsulation is the key technique: the stones are set into wet gel, then buried under a second clear layer and cured, so the finished surface is completely smooth. Nothing snags on sweaters, hair, or tights.
The appeal here is durability disguised as delicacy. From a normal viewing distance this reads as a slightly luminous French; up close, the light refracting through the gel over the crystals gives the whole nail a lit-from-within quality that plain polish cannot replicate. It is the most practical bedazzled option in this collection for anyone who types all day or works with their hands.
At the salon, ask specifically for “encapsulated crystals under builder gel” — any experienced tech will know the method. For the DIY route, Kiara Sky’s builder gel in a bottle makes encapsulation approachable: apply base gel, place stones, cure, then float a thicker clear layer over the top and cure again. File the surface smooth and finish with top coat. To personalize, swap the white tip for a soft gray or chocolate French line and keep the crystal layer identical.
4. Single Stone Statement on Matte Black
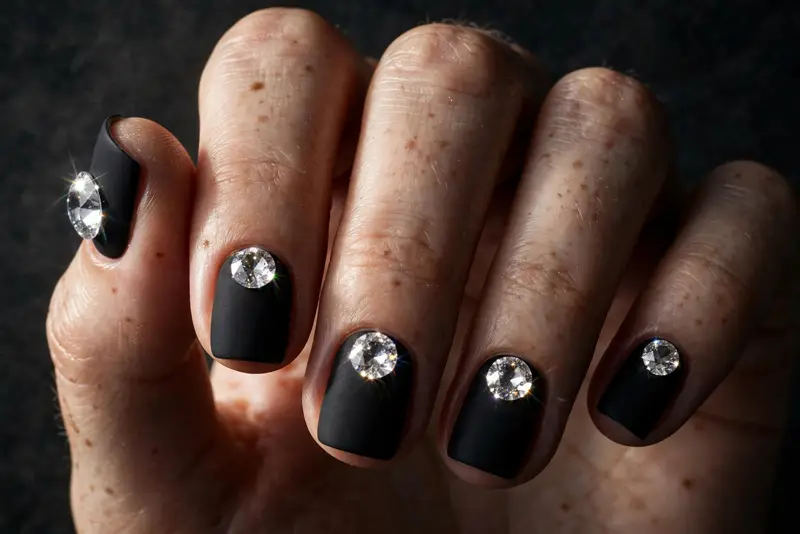
Short square nails in true matte black, each carrying exactly one large crystal placed dead center just above the cuticle. One stone per nail, nothing else. A Swarovski SS16 chaton or a small cushion-cut stone gives the right presence — big enough to read as jewelry, small enough to sit comfortably on a short nail bed.
This design works on contrast of scale and finish. Matte black absorbs light; the single faceted stone throws it back. That tension is what makes the look feel architectural rather than decorated. It is also one of the most wearable ideas here — short length, dark polish, and a single secure stone survive daily life far better than a field of small crystals, and the overall effect suits everything from creative offices to evening events.
Application is genuinely a ten-minute DIY. Matte top coat over two coats of black, then one dot of strong nail glue per nail and a single stone placed with tweezers. Press for ten seconds. Because there is only one stone per nail, you can afford to use your best crystals. To personalize, vary the stone color across nails — clear on four, one deep red or emerald on the ring finger — or shift the stone off-center toward the sidewall for an asymmetric, modern feel.
5. Aurora Opal Shimmer on Sheer Rose
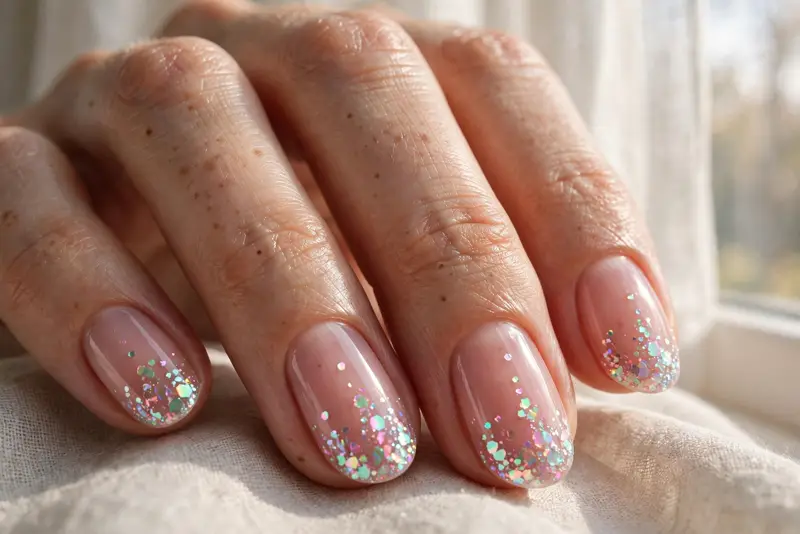
Sheer rose polish on a medium oval, scattered with iridescent aurora-borealis stones that shift between pink, mint, and pale blue as the hand moves. AB coating — the rainbow finish Swarovski pioneered — is what separates this from standard clear crystals. The stones themselves are small (SS6 to SS10), placed in a loose gradient that runs denser near the tip and sparser toward the cuticle.
The reason this reads softer than most bedazzled designs is the color behavior. Instead of hard white flashes, AB stones return tinted light that harmonizes with the rose base, so the sparkle feels integrated rather than applied on top. In daylight it is subtle; under evening lighting the color play becomes the whole point. This is the best choice in the collection for anyone who finds traditional rhinestones too harsh but still wants dimension.
Oval is the right shape because its curved tip mirrors the organic scatter of the stones — nothing here is geometric, and a squared-off shape would fight that softness. Apply over two coats of sheer rose with gel adhesive cured under a UV/LED lamp for longevity, or nail glue for a weekend version. To personalize, cluster the stones into a diagonal band across each nail instead of a gradient, or add two or three AB stones to an otherwise plain sheer manicure for a quieter take.
6. Gilded Smile Line on Dark Chocolate
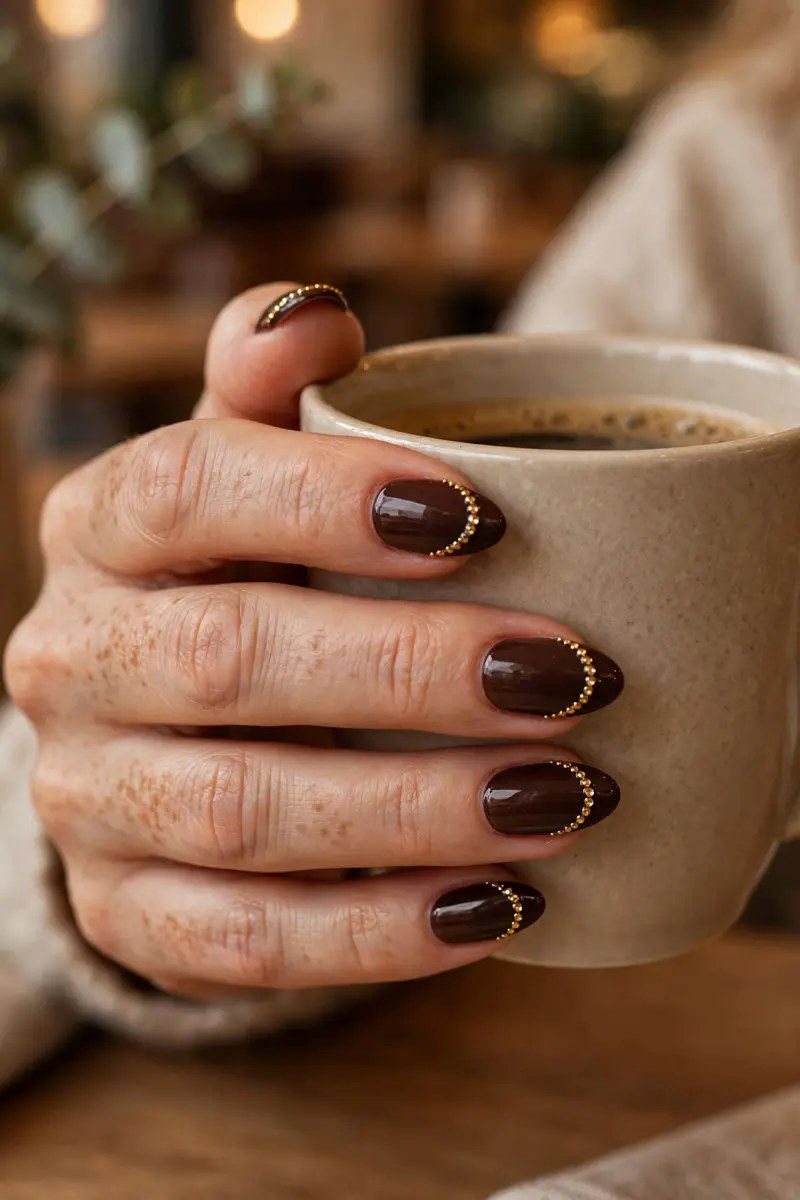
A rich dark chocolate base — the defining neutral of fall 2026 — on almond nails, with the French smile line redrawn entirely in small gold flat-back rhinestones. No white tip, no polish line: just a precise arc of metallic gold stones tracing where the smile line would sit. The effect is a French manicure translated into jewelry.
Gold against chocolate is one of the most reliable color pairings in the fall palette. Both are warm, both are deep, and the metallic finish of the stones gives the eye a place to land that flat brown polish alone cannot provide. The arc placement matters enormously — following the natural smile line keeps the design anchored to the nail’s anatomy instead of floating randomly, which is why it reads intentional and balanced rather than decorative.
Precision is the whole game here, so this rewards patience. Paint the chocolate base and let it dry fully, then use a thin striper brush to draw a faint guide arc in a lighter brown before placing stones one by one with a wax pencil. Gold stones in two sizes (SS8 for the arc, SS5 to taper the ends) give the line a natural beginning and end. To personalize, try rose-gold stones over black polish, or double the arc with a second parallel line of smaller stones for a bolder evening version.
7. Mosaic Cluster on Espresso Stiletto
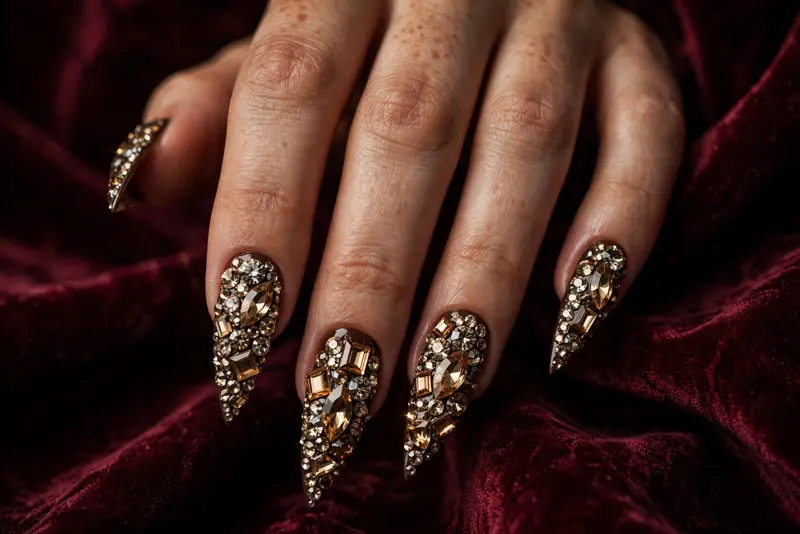
Espresso-brown polish on long stilettos, with a dense mosaic of mixed stones — round chatons, navette marquise shapes, and small square cuts in champagne, smoke, and topaz tones — clustered across the full nail. Think mosaic tilework: varied pieces fitted together with the dark base showing through as grout lines. It is the most textural design in this collection.
What makes mixed-cut mosaics work where random stone piles fail is the discipline of the color family. Keeping every stone inside the warm neutral range (champagne through topaz to smoke) lets the shapes and sizes create the variety while the palette holds the composition together. Different cuts return light differently — round stones flash, navettes stripe, squares glint — so the nail changes character as the hand moves. On a stiletto, which already reads dramatic, the mosaic turns the nail into a genuine focal point.
This is firmly a salon design and a special-occasion one; stiletto length plus heavy stonework is not built for keyboards. Ask your tech to set the mosaic into clear builder gel for structural support — the gel layer also protects the natural nail under the weight. To personalize, restrict the mosaic to a single tone, like all-smoke stones, for a more monochrome, sculptural feel, or mosaic just the lower half of each nail and leave the tips in plain espresso.
8. Center-Line Crystal Trail on Soft Gray
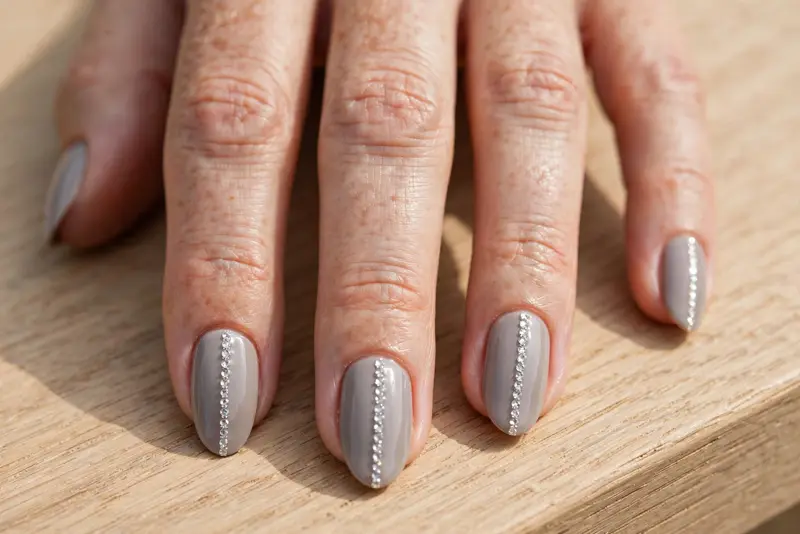
Soft gray polish — a warm greige rather than a cold concrete — on medium almond nails, with a single fine line of tiny crystals running straight down the center of each nail from cuticle to free edge. The stones are uniform and small (SS4 to SS6), spaced evenly like a seam. Nothing else on the nail.
The power of this design is linearity. A centered vertical line is the most elongating placement possible on a nail; it draws the eye along the full length of the finger and makes even medium-length nails read longer. The uniformity matters too — evenly spaced, identically sized stones create a rhythm that feels deliberate and calm, the opposite of scattered sparkle. Gray is the right base because it is quiet enough to let the line be the entire statement.
This is one of the most DIY-friendly ideas here. A striper brush and a steady hand place the adhesive line; tweezers or a wax pencil set the stones. Cure-friendly gel glue under a UV/LED lamp will hold the line for two weeks. To personalize, run the trail diagonally from one corner of the cuticle to the opposite tip corner, or use two parallel micro-lines with a hair of space between them for a tailored, pinstripe effect.
9. Floating Gems on Bare Negative Space
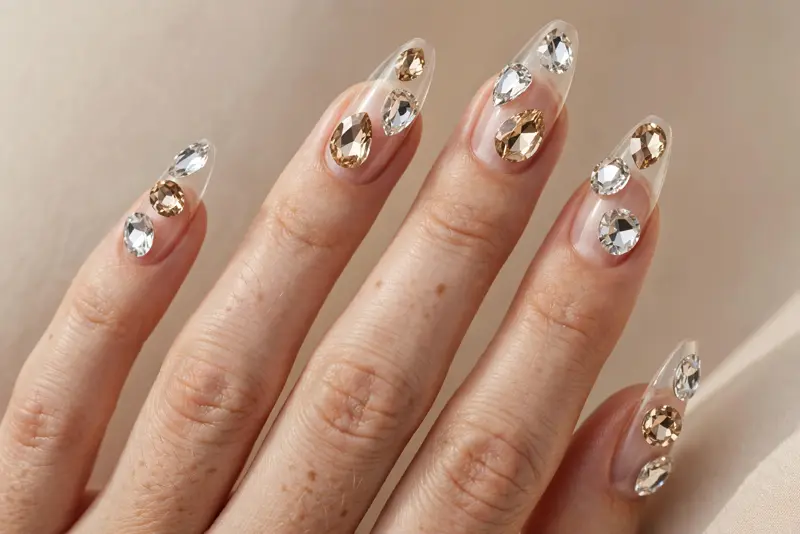
A clear builder-gel base with no color at all — just the natural nail showing through — carrying three to five chunky, dimensional gems placed sparsely across each long almond or coffin nail. The stones are the statement pieces: large cushion cuts, teardrops, and the occasional pointed chaton, in clear and pale champagne. Between them, bare nail. The gems look suspended, almost floating.
Negative space is what keeps this modern. Fully encrusted nails can read heavy; stripping the base back to nothing lets each stone function like a piece of fine jewelry against skin. The contrast between the naked nail and the oversized gems is the entire concept, and it works because restraint in the base makes the stones feel chosen rather than accumulated. This is the most editorial design in the collection — the one that photographs best for Pinterest.
Wearability is the honest caveat. Large dimensional stones catch on everything, so encapsulation or a thick gel overlay is non-negotiable if you want this to survive more than an evening. Ask your tech to build the structure in clear builder gel (Aprés Sculpting Gel holds this kind of work well), set the gems, and cap them. To personalize, reduce to a single large gem per nail placed off-center, which keeps the floating concept intact at a fraction of the fuss — and pairs surprisingly well with the season’s bambi and fawn nail art if you ever want to mix collections.
10. Jewel-Tone Stones on Black Cherry
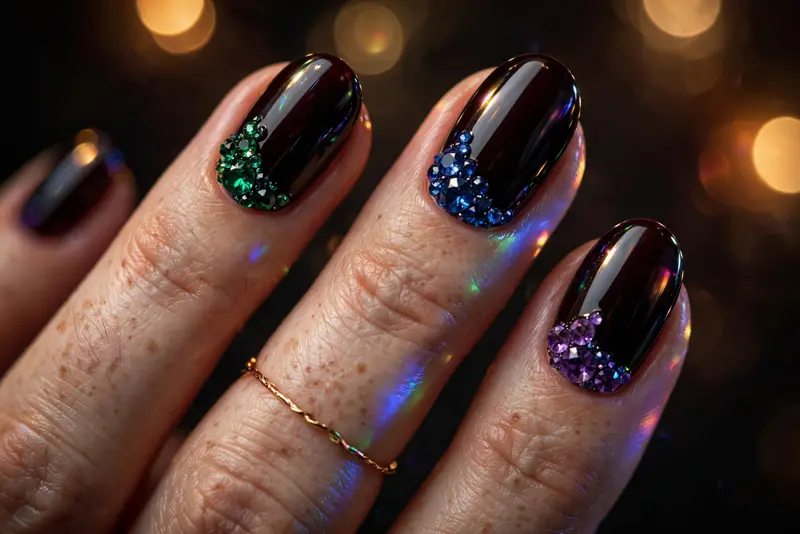
Near-black cherry polish — black with a deep red undertow — on oval nails, set with colored crystals in emerald, sapphire, and amethyst. The stones are medium-sized (SS10 to SS14), placed in small deliberate clusters of two or three near the cuticle and center of each nail. Color on color: the gems echo and amplify the base instead of contrasting with it.
Tone-on-tone is why this succeeds where random colored stones would look scattered. The black-cherry base is dark enough that emerald and sapphire stones genuinely glow against it, and because every color in the design lives in the same jewel-toned family, the clusters read as coordinated rather than busy. Under low evening light — restaurants, events, autumn nights — the colored facets do something clear crystals cannot: they return colored fire that shifts as you move.
This is an evening design, and it earns its place in a fall wardrobe the way gold nail designs earn theirs — through richness rather than brightness. Set the stones into gel adhesive and cure under a UV/LED lamp; colored stones show glue residue more readily than clear ones, so keep adhesive minimal and precise. To personalize, commit to a single gem color per manicure — all-emerald over black cherry is striking — or match your stone colors to a specific outfit’s jewelry for a coordinated event look.
11. Half-Moon Crystal Arch on Warm Taupe
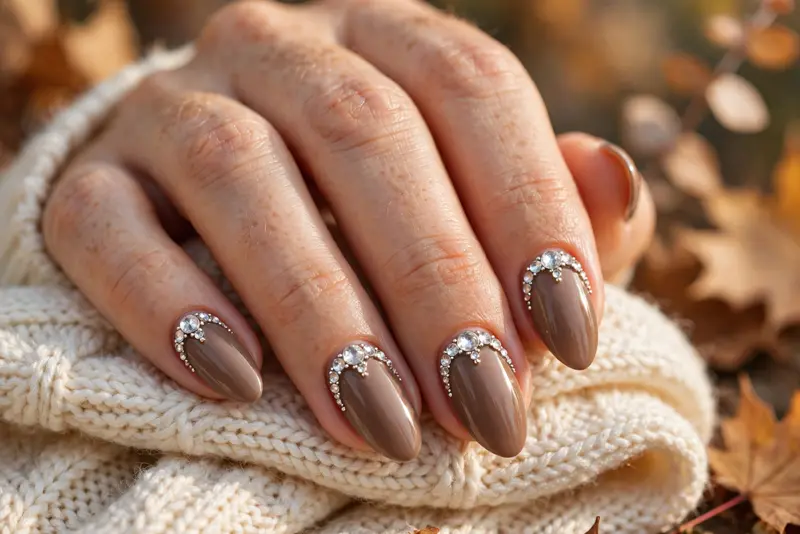
Warm taupe polish on almond nails, with small clear crystals arranged in a half-moon arch that follows the curve of the cuticle — an inverted French rendered entirely in stones. The arch sits a millimeter or two above the cuticle line, with slightly larger stones at the arch’s peak tapering to smaller ones at the ends.
The half-moon is one of nail art’s oldest motifs, and translating it into crystals gives it new life. The arch works because it mirrors the lunula — the pale half-moon at the base of your own nail — so the design feels anatomically inevitable rather than imposed. Taupe is the ideal partner: warm enough for fall, neutral enough that the crystal arch carries the full visual load. The overall effect is vintage in structure and current in execution.
Application is forgiving, which makes this a strong DIY candidate. The arch shape is easy to sketch first with a light pencil guide or a curved striping sticker as a template. Place stones with a dotting tool into small dots of glue, working from the center outward so the arch stays symmetrical. To personalize, double the arch — a second, smaller arc of micro-stones inside the first — or fill the half-moon’s interior with a sheer wash of champagne shimmer polish before placing the stones.
12. Micro-Crystal Tips on Short Round Nails
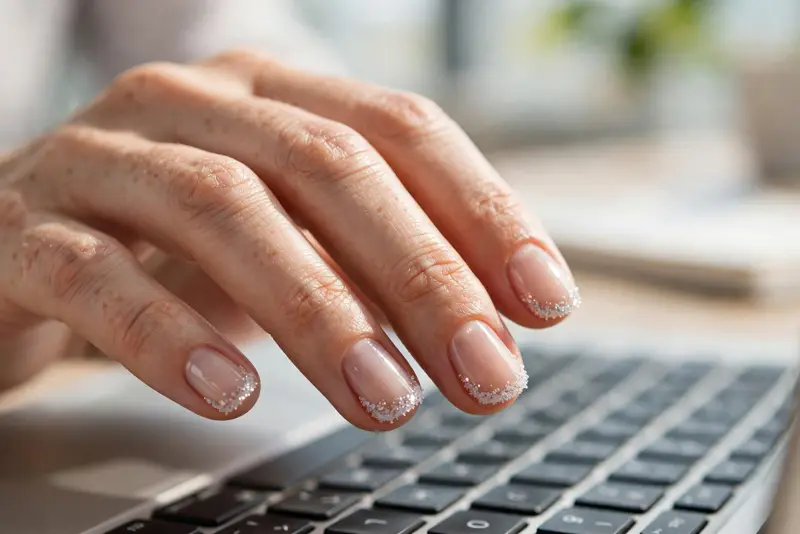
Short, natural round nails in a sheer nude, with micro-crystals (SS3 to SS5 — genuinely tiny) dusted along the free edge of each nail to form a sparkling tip. No smile line, no base color change: just a fine glittering edge where the nail meets the fingertip, like frost catching on the ends.
This is the quietest idea in the collection and arguably the most useful. Short nails are the reality for most women — typing, childcare, lab work, and plenty of workplaces rule out length — and micro-crystal tips deliver the bedazzled effect without any of the practical penalties. The sparkle sits exactly where light naturally hits the nail’s edge, so it reads as luminosity rather than decoration. It is office-safe, it survives dishwashing better than any other design here, and it takes about ten minutes.
The technique is simple: paint your sheer nude, then while the tip area is tacky, pick up micro-crystals with a damp dotting tool and press them along the free edge in a soft, slightly irregular line — perfect uniformity looks artificial at this scale. A single coat of top coat seals them. To personalize, fade the crystals into a gradient that dissolves toward the cuticle instead of a defined tip line, or use the technique as a gateway: once you trust the wear, graduate to the slightly bolder center-line trail in idea 8.
How to Apply Bedazzled Nails: DIY and Salon Guide
Getting crystals to stay put is a matter of preparation and the right adhesive. Start every bedazzled manicure the same way: push back cuticles, lightly buff the nail surface to remove shine, and wipe with a dehydrator or rubbing alcohol. Stones bonded to an oily or glossy surface will pop off within days no matter what glue you use.
For the DIY route, you have two adhesive options. Brush-on nail glue (the kind sold for press-ons) works for small flat-back crystals and lasts five to seven days; apply a small dot, place the stone with a wax-tipped applicator, and hold for ten seconds. For two-plus weeks of wear, use a gel adhesive — a thick clear builder gel or a dedicated gem gel — place your stones, and cure under a UV/LED lamp for 60 seconds. The gel method is what makes designs like the encapsulated French and the mosaic cluster genuinely wearable. A dotting tool, slightly dampened, is the easiest way to pick up and position small stones; tweezers give more control for large ones.
Seal the edges, not the tops. Run a fine brush of top coat around the base of each stone where it meets the nail, which locks it down without dulling the facets. Never flood top coat over large crystals — it clouds them. If a design uses stones bigger than SS12, consider having them set into builder gel rather than glued on top; the gel cradles the stone’s edges and absorbs impact.
At the salon, the conversation to have is specific: ask whether your tech encapsulates stones under builder gel or sets them on top with gem gel, and say which designs you are considering. Encapsulation suits active hands and larger stones; surface setting is faster and fine for small, flat stones. Bring reference images saved from this article — a good tech can read stone size, placement, and density from a photo faster than from any verbal description. Expect to pay a premium over a standard gel manicure; stonework is priced by time and materials, and a full mosaic or full-coverage set can double the appointment length.
Removal deserves the same care as application. Never pry stones off — you will take layers of natural nail with them. Soak glued stones in warm soapy water for ten minutes, then slide them off gently with an orangewood stick. For gel-encapsulated designs, have the salon file down the overlay and soak it off the way they would any gel enhancement. If you are unsure which method was used, default to the salon; ten minutes of professional removal beats weeks of growing out a damaged nail plate.
Pro Tips for Bedazzled Nails That Actually Last
Learn the SS scale before you buy stones. Rhinestone sizes run on the “stone size” scale, where SS5 is about 1.8mm and SS16 is about 4mm. Most everyday designs live between SS6 and SS10; anything above SS12 is a statement stone that needs gel support. Buying a mixed-size wheel in one finish is more useful than ten bags of a single size.
Match your metals to your stones. Gold rhinestones flatter warm fall bases — chocolate, espresso, burgundy — while silver and clear crystals sit better on cool bases like gray and black cherry. Mixing gold and silver stones in one design rarely works unless the mix itself is the concept.
Keep daily-wear designs under the “snag test.” After application, run the nail lightly over a piece of knit fabric. If stones catch, they will catch on everything you own — add a little more adhesive around the base or press the stone flatter into gel. Designs that pass this test, like the encapsulated French and the single-stone matte black, are the ones you will still be happy with on day ten.
Think about your nail shape before your stones. Long, narrow shapes (almond, stiletto, coffin) give stones room to breathe and suit scattered or gradient placements; short shapes (round, squoval) suit single-stone or tip-focused designs. If you are unsure which shape suits your hands, our nail shape chart breaks down how each shape changes the look of your fingers.
Plan for the season’s light. Fall’s low, warm daylight is the most flattering light crystals will ever get — it is worth wearing your boldest bedazzled design to a daytime event rather than saving it for evening. Conversely, AB and iridescent stones need some ambient light to show their color play; they look flat in dim rooms where plain clear crystals still flash.
Maintain, don’t just apply. Carry a tiny tube of nail glue for the first week; a stone that loosens on day three can be re-secured in seconds if you catch it, but lost entirely if you don’t. Avoid using your nails as tools — the number-one killer of stone manicures is opening cans and scraping stickers. And when one design starts to feel tired, remember that a plain fall manicure in burgundy or chocolate, refreshed with a single new accent stone, reads completely current on its own.
Frequently Asked Questions
How long do bedazzled nails last?
It depends entirely on the method. Stones applied with regular nail glue typically last five to seven days. Stones set into gel adhesive or builder gel and cured under a UV/LED lamp last two to three weeks — essentially the lifespan of the gel manicure underneath. Encapsulated designs last the longest because the stones are physically sealed inside the enhancement.
What is the best glue for rhinestones on nails?
For longevity, a UV/LED-cured gem gel or clear builder gel beats every brush-on glue. Gel forms a flexible bond that moves with the nail instead of cracking. Brush-on nail glue is fine for small flat-back stones worn for a few days, but expect to lose stones faster, especially on longer nails that flex.
Can I wear bedazzled nails on short nails?
Absolutely — scale is everything. Choose micro-crystals (SS3 to SS6), single-stone placements, or tip-focused designs like the micro-crystal tips in idea 12. One well-placed stone on a short nail reads as intentional jewelry; a cluster of large stones on a short nail bed will look crowded and lift faster.
How do I remove rhinestone nails without damaging my natural nails?
Never pull or pry. Soak glued stones in warm soapy water for about ten minutes until the adhesive softens, then ease them off with an orangewood stick. Gel-set or encapsulated stones need professional removal — filing down and soaking off like a standard gel manicure. Forcing removal is the main cause of thinning and peeling after stone manicures.
Final Thoughts
Twelve designs, one shared principle: the stones should feel chosen, not accumulated. Before you commit, think about your actual week — how you work, what you wear, how much maintenance you will tolerate — and let that narrow the field. A single stone on matte black worn confidently will always outperform a full mosaic that starts shedding by Wednesday. Save the images that match your life, show your tech the placement details that matter to you, and adapt freely: change the base color, shrink the stones, move the cluster. The best bedazzled manicure is the one you stop noticing and simply enjoy catching in the light.